Cutting Out Carving
- Share
- Tweet
- Pin
- Share
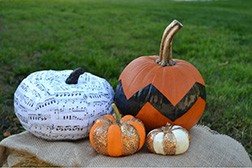
Avoid the pulpy mess of pumpkin carving with these non-knife alternatives. (From left) Decoupage, Chevron and Glitter Pumpkins.
October has settled in and with it comes the illuminated, carved faces of pumpkins peering out from porch steps and living room windows. It’s an age-old tradition of celebrating the Halloween season and one of its richest folktales.
According to history.com, the tradition of carving pumpkins began in Ireland in response to the folktale of Stingy Jack. As the legend goes, Stingy Jack invited the Devil out for a drink but, being cheap, didn’t want to pay for his beverage. So he convinced the Devil to turn himself into a coin to pay for their drinks.
Once the Devil transformed into a coin, Stingy Jack put the money into his pocket next to a silver cross, which prevented the Devil from changing back to his original form.
Eventually Jack freed the Devil, but under two conditions: he would not hassle Jack for a year and if Jack died, the Devil would not claim his soul.
A year later, Stingy Jack told the Devil to climb into a tree to pick fruit. While the Devil was in the tree, Stingy Jack carved the sign of the cross into the tree so the Devil could not come down. Stingy Jack eventually allowed him to come down only after he promised to leave Stingy Jack alone for a decade more.
Eventually Jack died. God would not allow him into heaven and with the promise not to claim his soul, the Devil would not take him in hell. Instead, he sent Jack off with a burning coal to light his way.
As the legend goes, Jack put the coal into a carved-out turnip and has been roaming the Earth ever since. He soon became known as “Jack of the Lantern” and then eventually, Jack O’ Lantern.
Soon, people began making their own versions using turnips and potatoes. These carved creations were put in windows and doors to frighten away Stingy Jack and other spirits. The choice canvas turned to pumpkins once Irish immigrants arrived in America.
While taking a knife to the orange fruit is tradition, people have long been finding new ways to steer clear of the unavoidable pulpy mess that results. There are several cool, creative and classy alternatives to gouging a nose, eyes and mouth into a pumpkin. Check out some of your other options below and remember, they can be done on real pumpkins or fake. Happy non-carving!
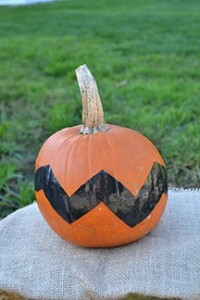
Chevron Pumpkin
Chevron Pumpkin
Honor Charlie Brown and the childhood classic of the Great Pumpkin with this simple but impressive chevron pumpkin.
What you need:
• Painter’s tape
• Spray paint or acrylic paint
• Paint brush (if using acrylic paint)
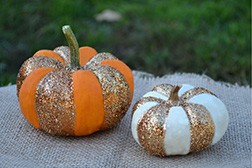
Glitter Pumpkins
Rules for creating a chevron pumpkin are pretty loose. Using the tape, tape out the chevron pattern and cover the stem of the pumpkin. Once the pattern is taped off, give the pumpkin a coat of paint. Wait a few hours for it to dry, then remove the tape to display a crafty alternative to carving.
Glittered Pumpkin
What you need:
• Mod Podge
Decoupage Pumpkin
• Glitter of your choice
• Paint brush
• Spray sealer
The great thing about this project is that you can freehand your to-be glittered design using Mod Podge and a brush, or you can follow the pumpkin’s shape to create a glittery every-other-node design.
To do this, brush Mod Podge on every other node, adding glitter as you work your way around. Seal the pumpkin with spray sealer and you’re done! You can also look for sponges in different shapes and use those to apply Mod Podge to the pumpkin before adding glitter.
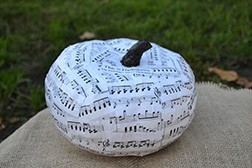
Decoupage Photo Pumpkin
Create a truly personalized pumpkin with photos of your family, friends and pet!
What you need:
• Photos
• Mod Podge
• Paint brush
Print several dozen of your favorite photos in black and white on regular printer paper and cut them out. I decided to print out the sheet music of the song, “This Is Halloween,” from the classic Tim Burton movie, The Nightmare Before Christmas. Spread Mod Podge on the back of each photo and place it on the pumpkin, using the brush to seal the paper to the pumpkin. Make sure to smooth out any wrinkles as you go. Continue to add photos and layer until the entire pumpkin is covered. Let the pumpkin dry for an hour, then add a layer of Mod Podge over the entire pumpkin. Let dry for two hours, then add another layer of Mod Podge to the outside. To keep the pumpkin year after year, consider doing the craft on a fake pumpkin. Enjoy!